QNAP NAS

QNAP online resources collection

Image
QNAP is the famous private cloud solution provider, the main product is NAS (Network attach Storage), this article collect QNAP online resources and help QNAPer / NAS beginner quickly know how to select NAS and find application information, if any suggestion website, welcome to comment and share with us. QNAP website  https://www.qnap.com/en/ Topic include NAS, Operation System, Application, Tutorial / FAQ , Forum and Customer Service.
How to setup TensorFlow on QNAP NAS

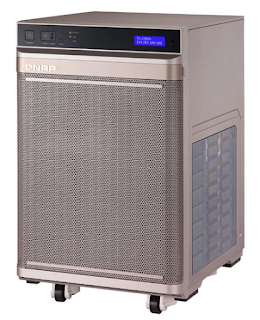
QNAP NAS for AI TS-2888X
QNAP TS-2888X

What is TensorFlow

  • TensorFlow™ is an open source software library for numerical computation using data flow graphs. Nodes in the graph represent mathematical operations, while the graph edges represent the multidimensional data arrays (tensors) communicated between them. The flexible architecture allows you to deploy computation to one or more CPUs or GPUs in a desktop, server, or mobile device with a single API. TensorFlow was originally developed by researchers and engineers working on the Google Brain Team within Google’s Machine Intelligence research organization for the purposes of conducting machine learning and deep neural networks research, but the system is general enough to be applicable in a wide variety of other domains as well.

Installation Instructions

  1. Open Container station and click on "Create Container".
  2. Search for keyword "TensorFlow". You can find the TensorFlow containers under the "AI" tab. Find "TensorFlow-GPU" and click "Install".
  3. Enter a name for the container.
  4. Click "Advanced Settings" and go to "Device".  Enable "Use GPU resource to run container".
  5. If needed, you can mount a specified NAS folder to this container in "Shared Folder". In the below screenshot, the folder "Public" is being mounted to the container.
  6. Click "Create". The container will be created and listed in the Overview page.
  7. You can now access the container using the terminal or SSH.
8.  open Jupyter Notebook

a. click URL 


b. Jupyter Notebook login need token  c. go to Terminal enter  /bin/sh  to connect into the Container 


enter: 
jupyter notebook list


it will show the token

http://localhost:8888/?token=048c7741d736c2741eb375ee189a20fbe09d364870a6001d :: /notebooks                                                                                     

then you can copy 048c7741d736c2741eb375ee189a20fbe09d364870a6001d to the jupyter notbook init page


and now you have the access to the jupyter notebook:


Suggested Reading

More information and resources for the TensorFlow can be found at:
  1. Officialwebsite
  2. Tutorials
  3. GitHub
  4. TensorFlow Model Zoo
follow up QNAP latest AI news in QNAP QuAI Community
setup Pytorch with QNAP NAS
setup NVIDIA DIGITS with QNAP NAS 

Comments

Popular posts from this blog

How to use MongoDB on QNAP NAS ?

How to setup influxDB and Grafana on QNAP NAS ?

How to use PostgreSQL on QNAP NAS ?

QNAP QVR Pro Client user guide

How to setup GPU on QNAP NAS (QTS 4.3.5+)

How to use QNAP IoT solution - QIoT Suite

How to use Home Bridge on QNAP NAS ?

卸任倒數 宏碁突圍再出奇招 不轉型雲端 施振榮:我就是罪人